
Using HDMI Cables With MacBooks
There are many reasons why MacBooks remain extremely popular despite their high prices.Some users simply love the look of the MacBook, while others got accustomed to using Macs and Apple products while still in school. But there are practical reasons as well. The MacBook’s operating system is updated frequently, crashes are rare, there are no end-of-life support issues, and compatibility problems are virtually non-existent because Macs primarily interface with other Apple software.
There is one compatibility issue that often does rear its head, though. How on earth do you connect a MacBook to a flat-screen monitor or other device that relies on HDMI connectivity?
Unfortunately, the answer is one of those aggravating responses everyone hates to hear: it depends.
MacBooks Through The Years
The MacBook has changed quite a bit since it was introduced well over ten years ago. On-board processors, memory, controllers, screen size, graphics cards and display resolutions have all been repeatedly improved (as have the machines’ aesthetics), as new models have been introduced.What has always confounded many MacBook owners, however, are the machines’ external connection ports. Even though HDMI has become a nearly-universal technology, very few Apple products have ever had HDMI ports (two exceptions have been the Mac Mini and MacBook Pro Retina). Instead, Apple has chosen other options, refusing to pay the royalty required to install HDMI sockets and leaving a generation of MacBook users frustrated. (One other supposed justification for refusing to adopt HDMI has been that the ports take up more space than the alternatives.)
When the MacBook was first introduced in 2006, most models used DVI and/or old Apple Firewire technology to interface with outside components, and updated Firewire ports are still found on a few MacBook Pros even today. When DisplayPort debuted shortly after the MacBook did, Apple created its own version known as Mini DisplayPort and began adding it to MacBooks in 2009.
Meanwhile, Apple was working with Intel to improve and rebrand Firewire. It was reintroduced as Thunderbolt on 2011 MacBooks, and it used a special port (which looked the same as a Mini DisplayPort) to connect the laptop to other devices. Thunderbolt 2 and Thunderbolt 3 followed, with the latter utilizing USB-C ports to transfer data.
It can be confusing to look at the ports on the side of a Mac, though. Standard USB-C connections are different than Thunderbolt 3 ones, even though their ports look the same. Thunderbolt cables and ports are usually identified with tiny lightning bolts, so be sure to look for them. Either Thunderbolt 2 or 3 is commonly used by most of today’s MacBook models.
What does this all mean? Simply put, in order to use HDMI cables with your MacBook you have to determine the type of ports on your machine. For many people, the easiest way to do that is find out the year and model of your laptop and look up its specifications. Others may just want to take a look at the machine’s ports and go from there.
How to Identify Your MacBook
You can determine your MacBook’s year and model by selecting “About This Mac” from your laptop’s Apple menu, located at the top left of the screen. It will tell you the computer’s year of release and model specifics. You can then find all of the tech specs for your machine, including port information, by searching for your model here.But since you’ll eventually have to deal with the ports, it might save time and effort just to inspect them right away.
If you own a MacBook Pro from 2016 or later, or a 13-inch MacBook Air from 2018 or later, it probably has a Thunderbolt 3 USB-C port (with the lightning bolt). Earlier MacBook Pros are likely to have Thunderbolt 1 or Thunderbolt 2 ports. For some of the oldest MacBook models, your only alternative may be to use the Mini DisplayPort (which looks just like a Thunderbolt 1 or 2 port, but with a monitor icon instead of the lightning bolt). Be sure to remember that Thunderbolt and Mini DisplayPort ports are not interchangeable even though they look the same.
Now that you know what you have – you can get what you need.
Connecting Devices to MacBooks With HDMI Cables
Connecting a MacBook with HDMI is simple, with the help of an adapter cable. Not just any cable will work, but here’s the good news: now that you know what type of video port your MacBook has, it’s easy to choose the right adapter.For newer MacBooks which use Thunderbolt 3, all you need is a USB-C to HDMI adapter cable. The plug that looks like a USB-C connector goes into your laptop’s Thunderbolt 3 port, and the other end of the cable can connect to your HDMI extension cable.
.jpg) If you have an older MacBook which only allows you to use Thunderbolt (1 or 2) or Mini DisplayPort, you simply need to purchase a Mini DisplayPort to HDMI adapter cable, and attach it the same way.
If you have an older MacBook which only allows you to use Thunderbolt (1 or 2) or Mini DisplayPort, you simply need to purchase a Mini DisplayPort to HDMI adapter cable, and attach it the same way.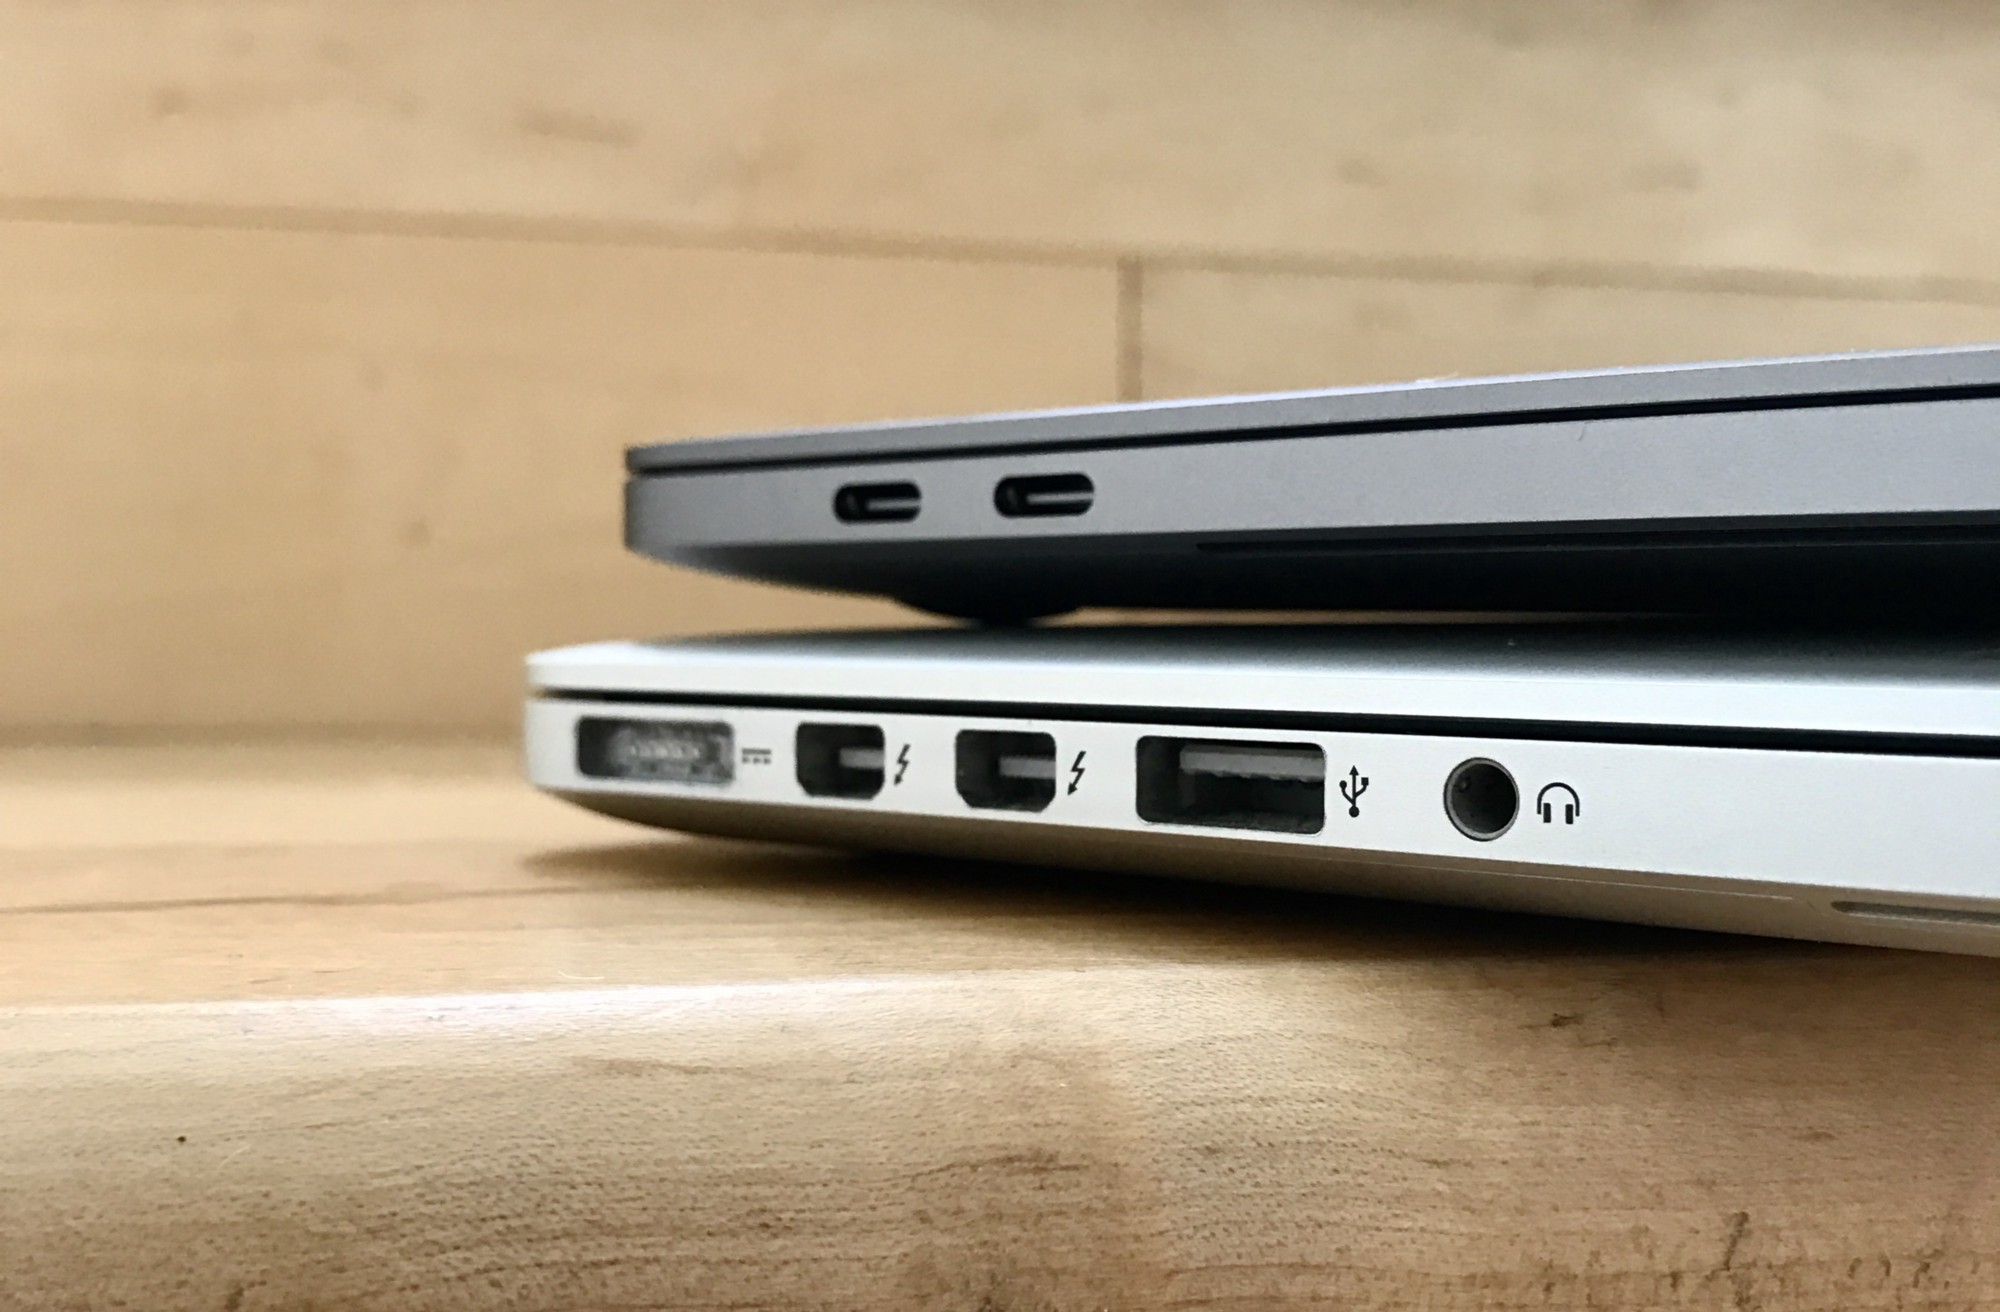 One important thing to know before you head to the big box store or search online for your adapter cable: many vendors will try to sell you a “super-duper” ridiculously-expensive cable. Don’t fall for their sales pitch, because as long as cables meet industry standards – and just about all commercially-available cables do – there’s nothing super-duper about the overpriced versions except for the vendor’s profit margin.
Cmple has the high-quality cables you need in order to connect a MacBook to an HDMI device, at the lowest price. You can find the USB-to-HDMI cable here, and the Mini DisplayPort-to-HDMI cable here.
You’re Almost Done
There’s one more chore you may need to tend to before you can enjoy the video being fed from your MacBook to an HDMI monitor: adjusting your laptop’s settings.If the MacBook doesn’t initially recognize the HDMI device, leave the MacBook on and turn off the device. Unplug the cable from your laptop, plug it in again and restart the HDMI device.
It could be that the video feed displays at the wrong size. If that happens, go to System Preferences > Displays from the Apple menu and move the “Underscan” slider that’s displayed, to adjust the size of the picture you see on the monitor. (If the video you’re trying to watch is low-resolution instead of HD, you can change the resolution setting in that same window.)
A Mac gives you the option of using either the computer or the connected monitor as the primary display. That’s also controlled from the Displays screen; click the Arrangements tab and check “Mirror Displays” if you want the computer to be your primary display screen. To make your HTML-connected monitor primary, drag the menu bar from the small “built-in” image to the larger external TV image.
If you’re not hearing audio, choose Sound from the System Preferences menu and ensure that the proper destination device is selected.
And you’re all set. Enjoy!
0
Featured products
